PoseNFS
PyTorch implementation of Pose Neural Fabrics Search (PNFS)--Part-specific neural architecture search for human pose estimation. Revised: 2020-12-5
Introduction
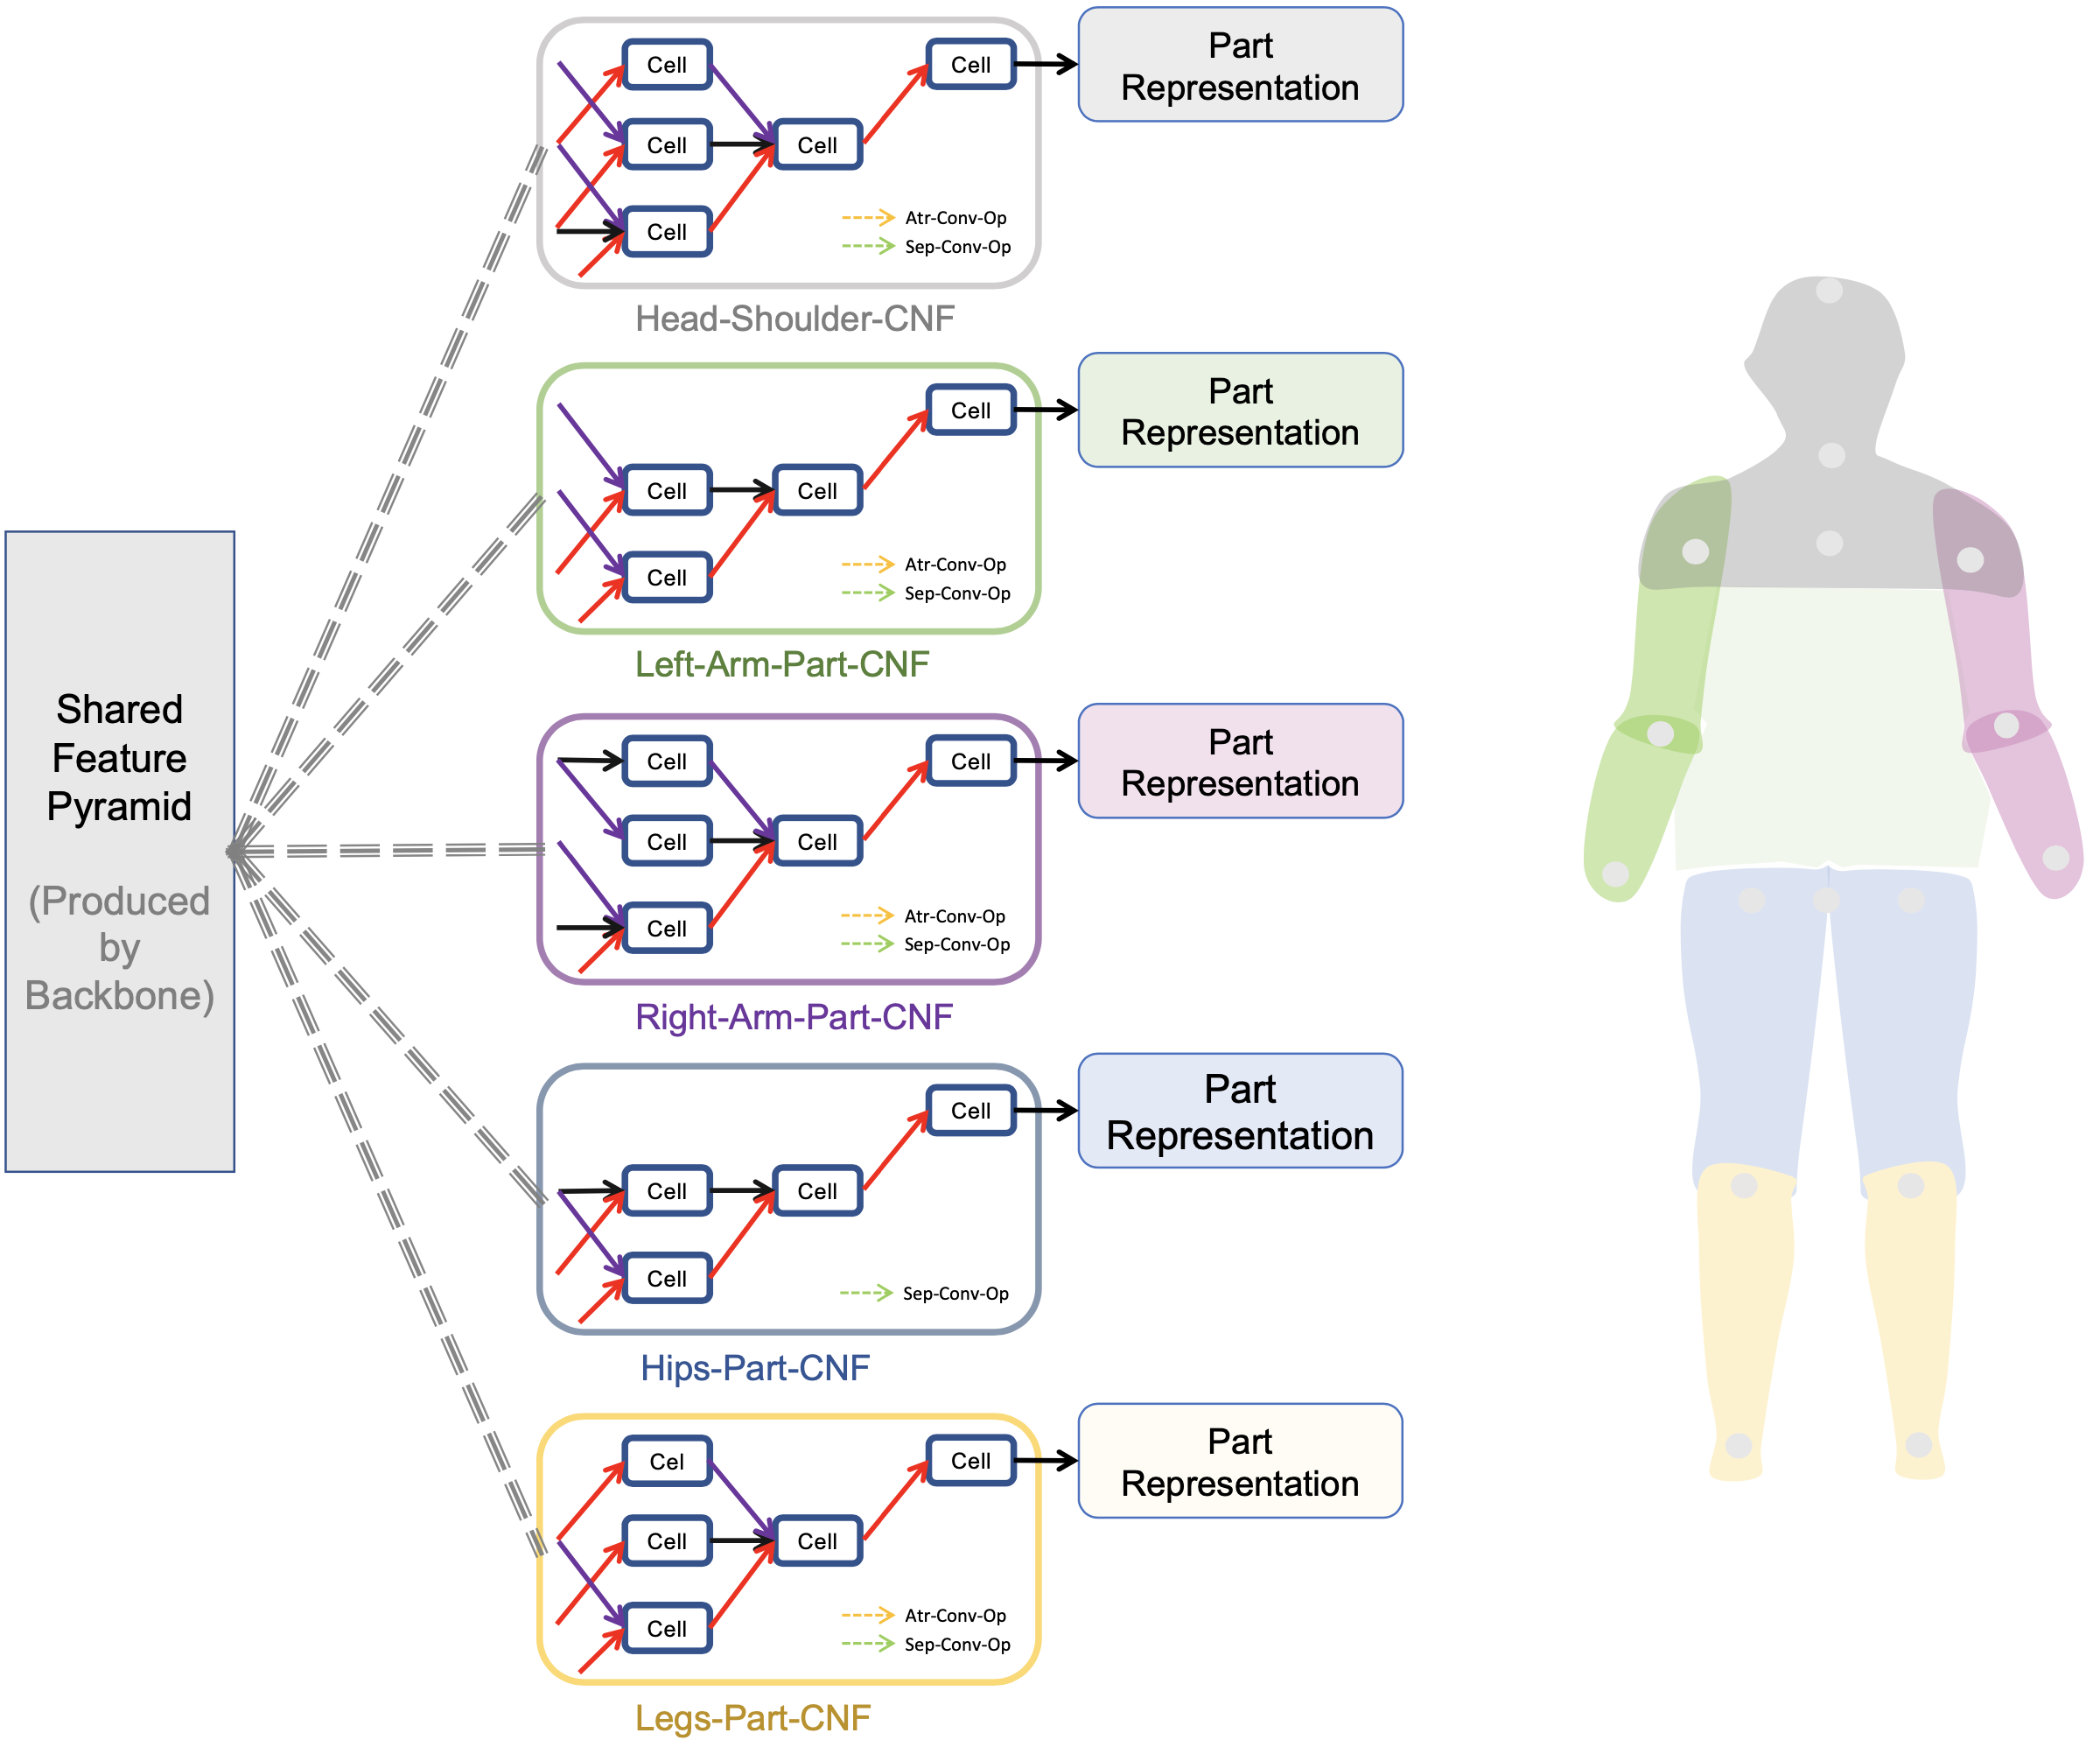
Search part-specific Cell-based Neural Fabrics (CNFs) with the guide of the prior knowledge of human body structure.
This repository is our PyTorch implementation of the paper Pose Neural Fabrics Search (PNFS) (arXiv 1909.07068).
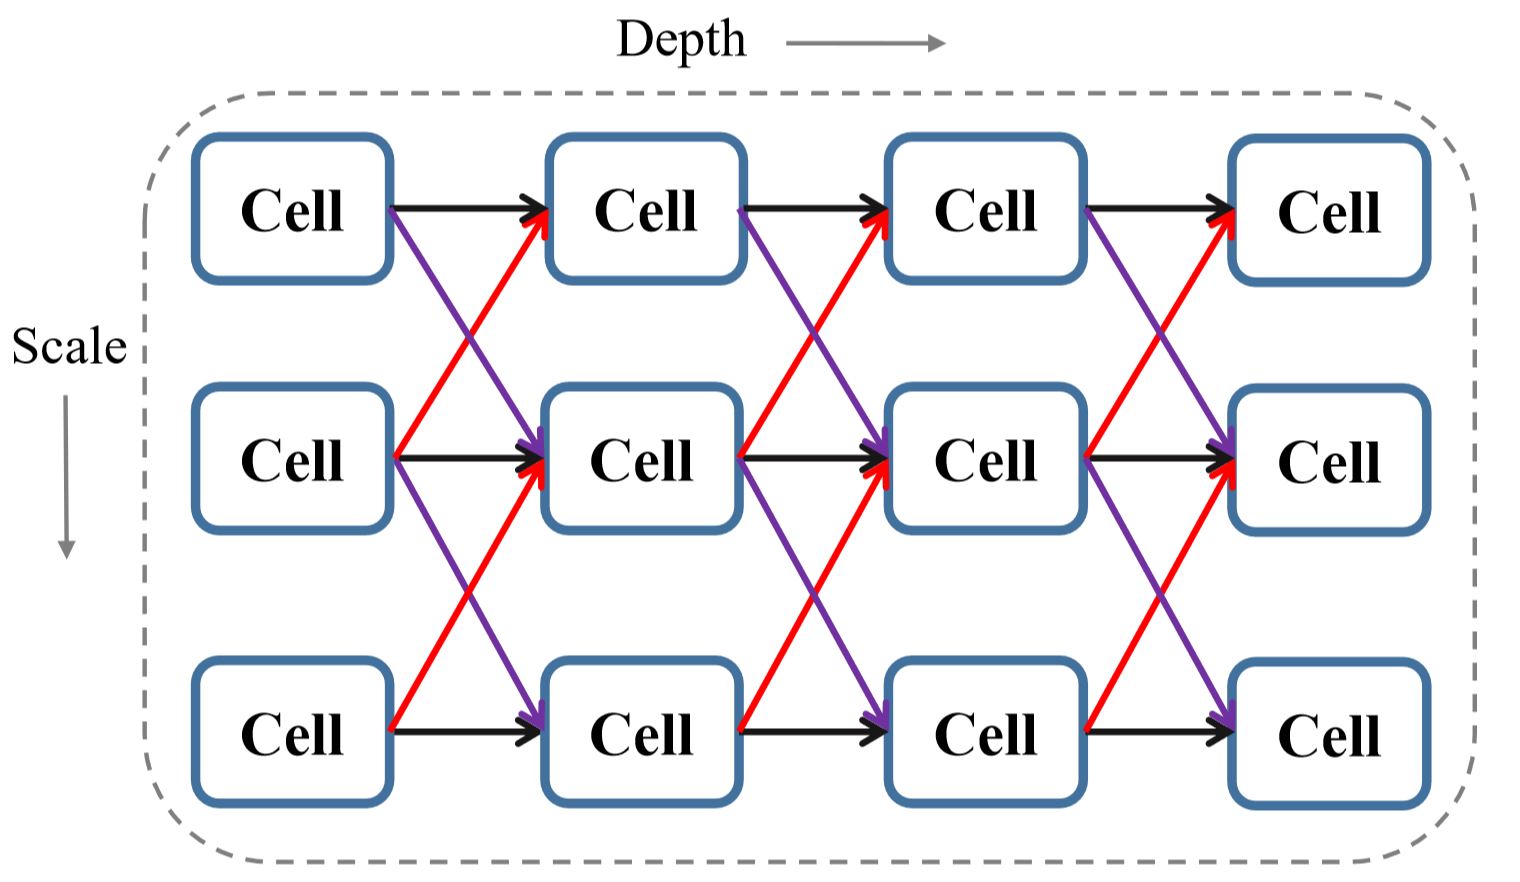
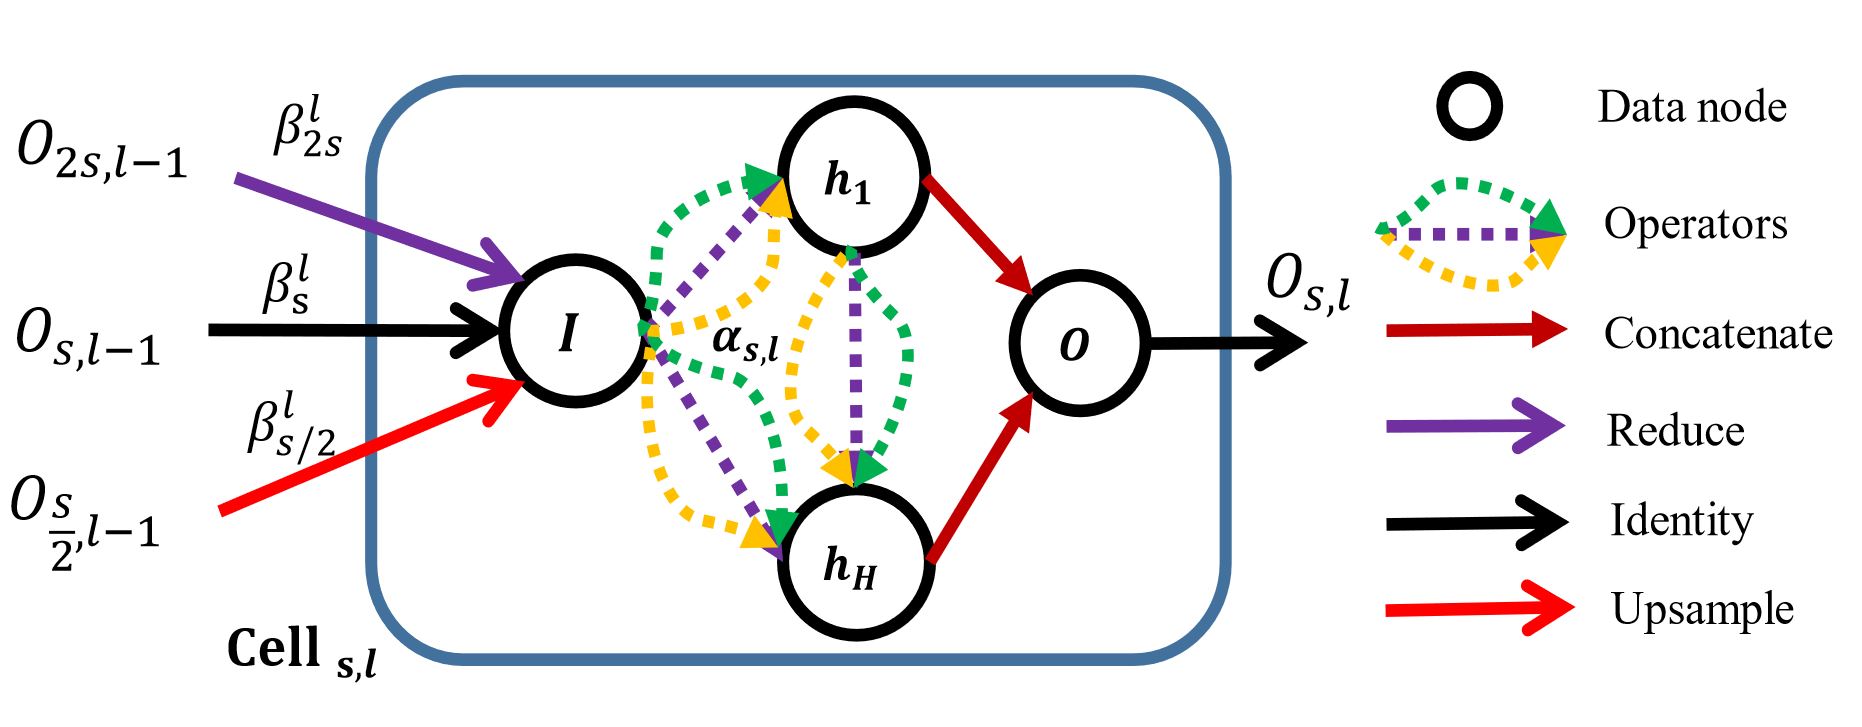
Neural architecture search space at macro and micro level:
Usage
Dependencies
Install PyTorch (>=1.0.0) and the packages mentioned in requirements.txt by pip install -r requirements.txt.
Data Preparation
We follow the steps of this repository for preparing MPII and COCO dataset, please see the https://github.com/microsoft/human-pose-estimation.pytorch#data-preparation.
Download ImageNet Pretrained Models
- Resnet-50 (23.5M): Download,
- MobileNet-V2 (1.3M): Google Drive from this repo.
- HRNet-W32-stem~stage3 (8.1M): Google Drive from this repo.
- More …
Create the o directory to preserve each experiment’s output
mkdir o
Train the model
python train.py \
--cfg configs/example.yaml \
--exp_name o/default_exp/ \
--gpu 0,1
other optional commands for training
--batchsize 32
--param_flop   // report parameters and FLOPs
--search search_method_name   // options: ['None','random','sync','first_order_gradient','second_order_gradient']
--debug   // visualize the input data
--visualize // visualize the predicted heatmaps for an image (per 5 epcohes in training)
--show_arch_value   // print the parameters of architecture in the training process
Distributed multi-gpu training in a single machine (node)
sh distributed.sh
nproc_per_node means how many gpus are used.
Test the model
python test.py \
--cfg configs/mobilenet_v2_CNFx3_coco_384x288.yaml \
--exp_name o/mobile_cnf3_coco/ \
--gpu 0,1 \
--test_model /path_to/mobilenet-v2_nfx3_384x288_coco_ckpt.tar \
--flip_test
other optional commands for testing
--visualize   // visualize the predicted heatmaps
--param_flop
---margin 1.25  // [1.0,1.5] margin between bbox border and input size when testing
--flip_test   // horizontal flip test
--use_dt   // use the detection results of COCO val set or test-dev set
Update
- [2020.5.20] Add the Prune function
Arch=Prune(Arch, prune_cells=True, prune_operations=True)to prune the useless cells and operations according to the architecture parameters. It doesn’t sacrifice the precision and doesn’t need to re-train. A new search result is obtained with 72.3 AP performance with 15.9M for COCO test-dev2017.
Detailed Settings
All of the detailed settings of the model are recorded in the configs/*.yaml.
Configuration for Fabric-Subnetwork
A snippet example of the *.yaml for the hyperparameters of subnetworks :
subnetwork_config:

  dataset_name: 'coco'
  parts_num : 3
  cell_config:
      vector_in_pixel : True
      vector_dim: 8
      convolution_mode: '2D'

      search_alpha: true
      search_beta: true
      operators: ["skip_connect", "Sep_Conv_3x3","Atr_Conv_3x3","max_pool_3x3"] #
      depth: 7
      cut_layers_num: 4  # first several layers
      size_types: [4,8,16,32] # scales is [1/4, 1/8, 1/16, 1/32]
      hidden_states_num: 1
      factor: 16
      input_nodes_num: 1 # default
Model
|BackBone + Head|Params/FLOPs|Result|Download| |–|–|–|–| |MobileNet-V2 + CNFx3|6.1M/4.0G|67.4-COCO Test-dev|Google Drive| |HRNet-W32-stem~stage3 + CNFx5|16.4M/9.4G|90.1-MPII Val-set|Google Drive| |HRNet-W32-stem~stage3 + CNFx5|15.9M/14.8G|72.3-COCO Test-dev|Google Drive|
See the paper (newly) or configs for more details.
Body Parts Mode
The body keypoints assignment for different parts is defined in src/network_factory/body_parts.py
Vector Representation
We provide two types of convolutional mode Conv2d and Conv3d to show how to construct the vector representation (5D-Tensor) of keypoint in src/network_factory/subnetwork.py. We use the Conv2d mode (reshape 5D-Tensor to 4D-Tensor) by default.
Exploration
More potential cutomized computing units can be defined as candidate operations in src/architecture/operators.py.
Citation
If it helps your research, please consider citing:
@article{yang2019pose,
  title={Pose Neural Fabrics Search},
  author={Yang, Sen and Yang, Wankou and Cui, Zhen},
  journal={arXiv preprint arXiv:1909.07068},
  year={2019}
}